
DRIP, YES PLEASE! But Overwhelmed with Where to Start…
From Zero to Hero! A Step by Step Guide to Earning 1% Daily!


From Zero to Hero!!
Download these programs, add these extensions, buy these coins, then use this program to swap for that coin, etc, etc, etc… If there is one thing I have definitely learned, it’s that there is no straight path to the end of the road when it comes to securing cryptocurrencies. There are a ton of different articles out there that outline some of the processes, but I wanted to share my own personal path to DRIP here! I’m sorry if it looks lengthy, but this article will get you from zero to hero in great detail with an easy to follow step by step path! You’re Welcome!
Crypto.com
First you’ll need a way to get your regular currency into an exchange where you can buy and sell crypto. I personally used Crypto.com and have found the products and services incredibly robust. Plus, they have some seriously cool metal credit cards that can be pre-loaded with crypto to be used anywhere Visa is accepted! Imagine that… use your Crypto.com Card for a night out on the town! Here are a few images and steps on how to get started:
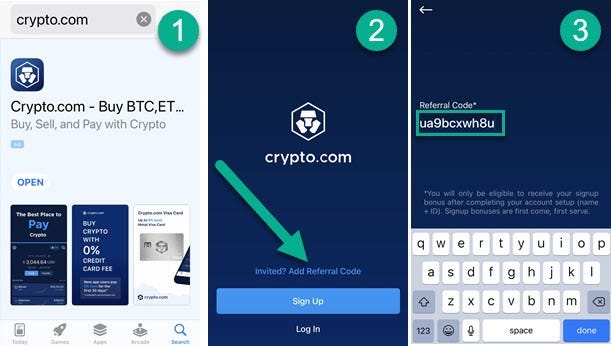
Search for crypto.com on your mobile device to download the crypto.com app. From there you can sign up for an account. If you have a referral code, go ahead and click the Add Referral Code link. Doing this will get both you and I a $25 USD referral bonus! This is my code if you choose to use it — ua9bcxwh8u.
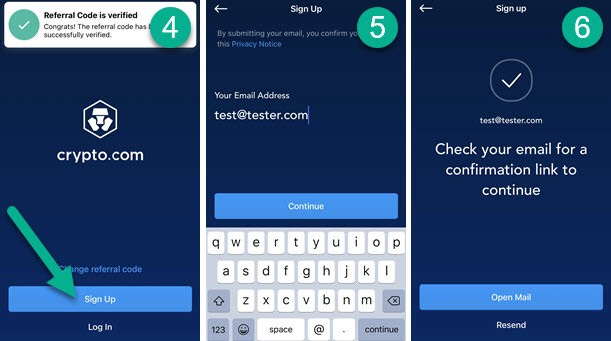
Once the referral code is verified, it’s time to sign up for your account. Enter your email address and hit Continue. Once crypto.com has established a unique email address has been used it will send you a confirmation link. Just head over to your mobile mail account and click on the link to open the new crypto.com account application.
I’m not going to detail out the account application process, but crypto.com does have a KYC (know your customer) policy in place. You’ll enter personal details, and they will verify your SSN and address info as well as capture an image of your photo ID. Once they have verified all of the information you’ll be able to choose how you want to fund your new account. It was a super easy process!
Personally, I tried to set up my initial transfer with a credit card, but apparently, my card doesn’t work with crypto exchanges. So, I tried my debit card… same result! But if you prefer to use that method, be sure and try it. I’ve got several buddies that didn’t have any issues with going that route.
Otherwise, you can set up an ACH by going to your Accounts tab in the app. Select Fiat Wallet (your mainstream legal tender) and +Set Up New Currency. Find your currency and select it to request an email from crypto.com that will include all of the information needed to set up your ACH including the Routing Number, Account Number, Account Type and Bank.
I was fortunate enough to be able to use my online banking portal to create the ACH or Bank to Bank transfer. I simply used the info from the email and my bank sent $.06 to the my new crypto.com account for verification. Now I can transfer my USD to my crypto.com account anytime or I can withdraw cash from my crypto.com fiat wallet directly to my checking account. Incredibly Handy!
Now you have the means by which to convert your fiat currency into crypto currency via the crypto.com app! So, what’s next?
METAMASK.io
The next thing you are going to need is a crypto wallet and a means by which to access blockchain apps. Enter metamask.io. I highly encourage you to download the metamask extension on your desktop/laptop device — I use it there regularly. However, since crypto.com is currently only accessible via mobile devices, the example below will also be for mobile!
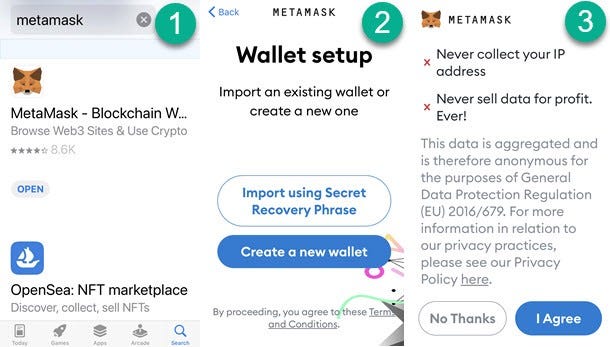
Search for metamask on your mobile device and download the MetaMask app. Then you can Create a New Wallet. After reviewing the initial MetaMask conditions, click I Agree if you choose to continue.
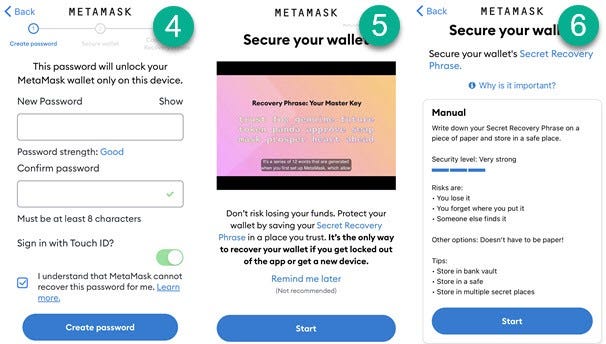
Enter a strong password that will unlock the MetaMask wallet specifically to your mobile device. I left Touch ID/Face ID on and just use my finger print to access the wallet. The next steps are advice on securing your MetaMask wallet. I cannot stress how important this is!
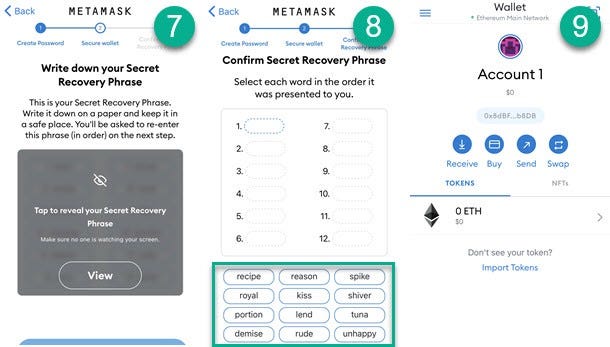
At this point you are going to be able to View your Secret Recovery Phrase / PassPhrase. I’d write it down on actual paper at this point in the same order in both columns and rows. This is the only key to unlock your wallet or import the wallet info to a different area — on the MetaMask web extension for your desktop/laptop for example. Store this phrase offline and make certain it cannot be lost!! After successfully dropping each phrase where they belong, your new MetaMask wallet will be available for business! Notice that the default is the “Ethereum Main Network” — which is great and you can use that for future transactions, but we’ll need to make a few more additions to the wallet for it to also work on the Binance Smart Chain.
Adding the Binance Smart Chain Network
DRIP can be exchanged with BNB (BEP-20) which is part of the Binance Smart Chain. So the steps below will add the Smart Chain Network to your MetaMask wallet.
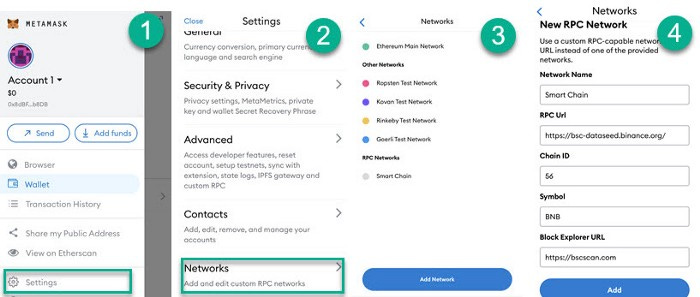
Click the hamburger icon (three lines) in the upper left hand corner of the MetaMask app to access the side-menu. Then select “Settings” — “Networks” — “Add Network”. Add the New RPC Network information as follows:
Network Name: Smart Chain
New RPC URL:
https://bsc-dataseed.binance.org/
ChainID: 56
Symbol: BNB
Block Explorer URL:
https://bscscan.com
Now you can switch between wallet networks anytime by tapping the Wallet at the top of the app!
Importing Tokens to the MetaMask Wallet
This will cover a couple more items that you will want to consider for future needs. These are not necessarily a must at this point, but you might as well knock them out now since you’re this deep into the setup!
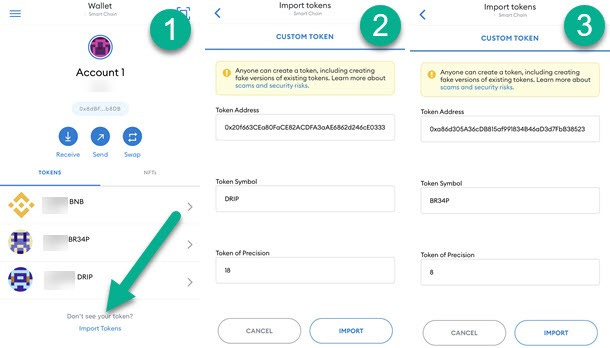
From the main MetaMask screen (Make sure you’re in your Smart Chain Network), select Import Tokens from the bottom. Then use the token addresses below to import DRIP and BR34P. I recommend copying and pasting the Token Address in, and when you click out of the input field, the Token Symbol and Precision will automatically populate.
When you start Claiming your 1% DRIP daily, you’ll want to see your DRIP balance here in your wallet! And if you plan to take advantage of the Team aspect as a DRIP player, you’ll want to own at least a couple of BR34P tokens to take advantage of downline referral rewards! If you’re not familiar with how that works, there are articles out there already… but I’ll publish my own as soon as time permits.
DRIP Token Address (View Contract Here)
0x20f663CEa80FaCE82ACDFA3aAE6862d246cE0333
BR34P Token Address (View Contract Here)
0xa86d305A36cDB815af991834B46aD3d7FbB38523
Crypto.com to Purchase BNB
Whether you choose to use the Crypto.com Fiat Wallet and ACH or you use a credit card on Crypto.com for a direct BNB (BEP-20) purchase, You’ll need to calculate how much BNB to obtain. Keep in mind that you need to exchange BNB for at least 1 DRIP token to join their network. Visit the DRIP Fountain page to see the current Price of DRIP in USD (Scroll down to the Chart) and determine the price of BNB from your Crypto.com app. You’ll also want to keep a small reserve of BNB in your wallet to pay for gas fees when hydrating or claiming your 1% Daily. (My fees are usually around $0.30 USD). I’ve detailed both ACH and Credit Card options below.
Crypto.com to Purchase BNB via Fiat Wallet and ACH
There are a number of different ways to do this in the app, but here are some specific steps:
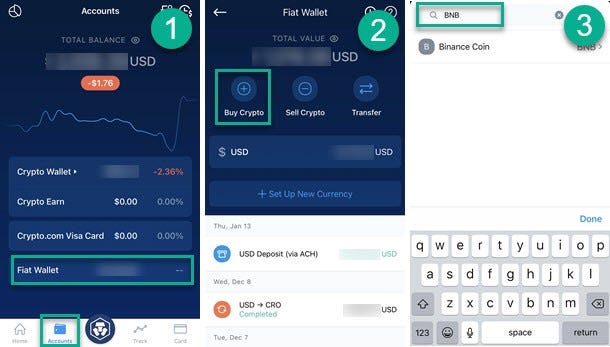
From the Accounts tab, select the Fiat Wallet. Then select Buy Crypto, and finally Search for BNB.
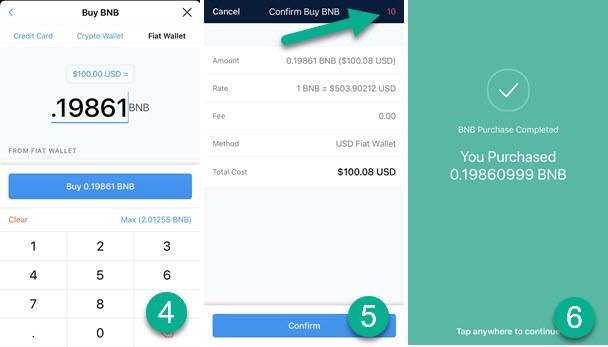
You’ll want to determine the price of the cryptocurrency you are looking to purchase as noted above in comparison to your fiat equivalent. In the example, .19861 BNB is $100 USD (And at the time of this article that is more than enough to join the DRIP Network!). Note the arrow pointing to a small red number in step 5. That is a countdown timer. Once you get to this step, you’ll need to review and confirm the transaction fairly quickly.
Crypto.com to Purchase BNB via Credit Card
If you have the ability to add a credit card to your Crypto.com account, it’s a very direct approach:
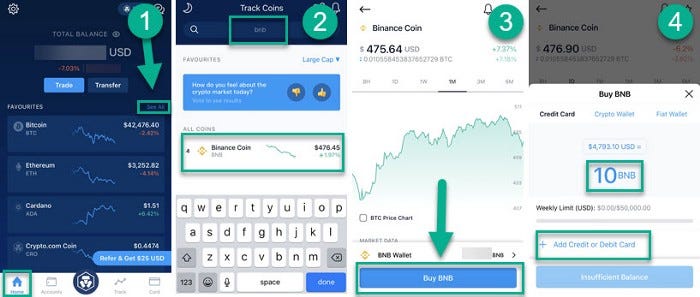
From the home page, select “See All”. Then search for BNB. When the Binance Coin BNB appears, select that link to view the data for BNB. Enter the amount of BNB that you would like to purchase and hit the Buy BNB button. Finally, click Add Credit or Debit Card to add your account. If it allows the card to be added you should be good to go. Your card info will be saved for future use.
Crypto.com and 2FA
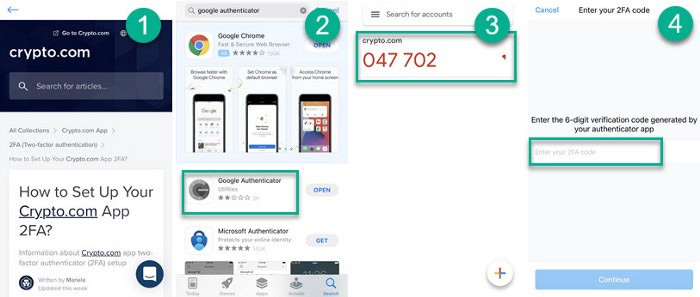
At the time I wrote this article I had already established my 2FA (Two Factor Authentication) so I don’t have great screenshots. Nevertheless, this will be required before you can transfer cryptocurrency out of your Crypto.com account and into an External Wallet such as MetaMask. In the 1st image — Follow this link to “How to Set Up Your Crypto.com App 2FA” for a step by step guide on getting this setup. They mention several different authenticators, but I used Google Authenticator as noted in the 2nd image and it’s been solid for me. Image 3 is an example of the Google Auth 6 digit code for crypto.com. Notice it is red… again, that means it’s a countdown timer! Just wait a few seconds for the wheel to spin back around and get to a solid green code — simply click the code to transfer it to the clipboard. And then paste it in the Image 4 example of what you’ll see in the Crypto.com app.
Crypto.com Transfer to MetaMask

Start in your MetaMask wallet and click your wallet address to copy it to the clipboard. Then from the Crypto.com app, go to the Accounts tab and select Binance Coin. From there you’ll select Transfer and then Withdraw.
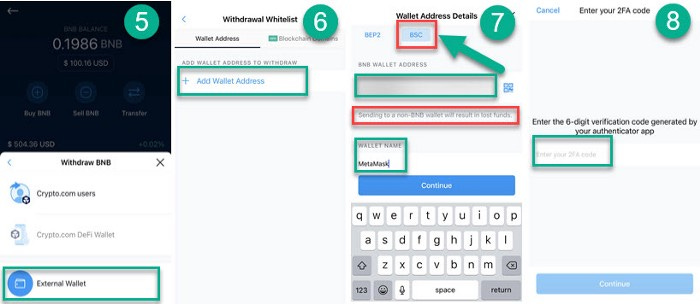
In the Withdraw BNB window you’ll scroll until you can see “External Wallet”. Then Select the Add Wallet Address.
Step 7 is pretty important so pay attention! Make sure to change the light blue selection at the top to BSC (Binance Smart Chain). Then paste (from Step 1) your MetaMask wallet Address into the Wallet Address field. Read carefully… in the 2nd red box — “Sending to a non-BNB wallet will result in lost funds.” And finally in Step 7 give this Wallet a name. I used MetaMask.
If you’ve already set up your 2FA you’ll likely see a prompt for a code next.
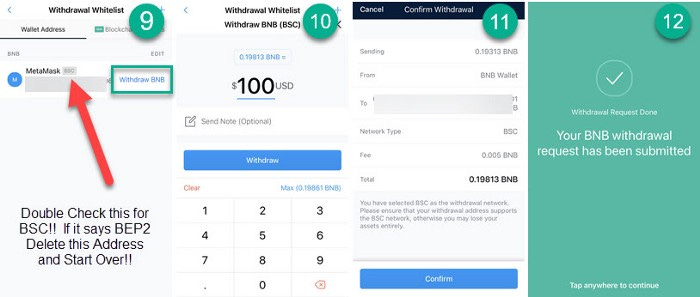
After successfully adding an external wallet, you’ll return to the screen in step 9. Be sure to double check for BSC and NOT BEP2. Then simply apply the amount you would like to transfer and confirm the transfer. It only takes a few moments to minutes generally to see the funds show up in your MetaMask wallet.
Purchase DRIP from the FOUNTAIN
We’re almost there!! You’ll be earning 1% Daily in just a few moments!
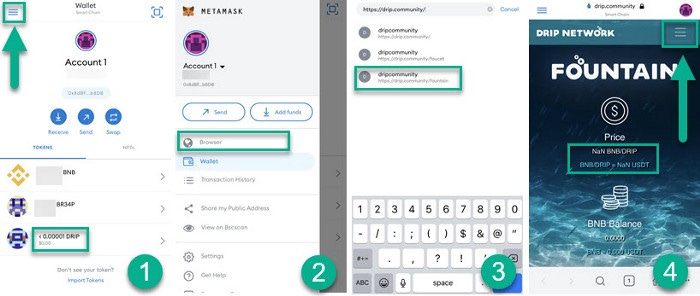
Starting with No DRIP… select the side menu and then switch into the MetaMask Browser. You’ll need to do all of your purchase/sale/swaps from outside web pages via the MetaMask Browser because the wallet will need to be connected to the site. Then go to the Fountain to purchase DRIP — https://drip.community/fountain. Open the Fountain menu to access the Wallet Connection.

Clicking Connect Wallet will allow
https://drip.community/
and your MetaMask wallet to conduct crypto exchanges. Once you see an actual BNB/DRIP price, you’ll need to scroll down to the Buy DRIP area. Enter the amount of BNB you would like to exchange, in the example above .15 BNB purchases 1 DRIP token. Click the BUY button to view the confirmation pop up.
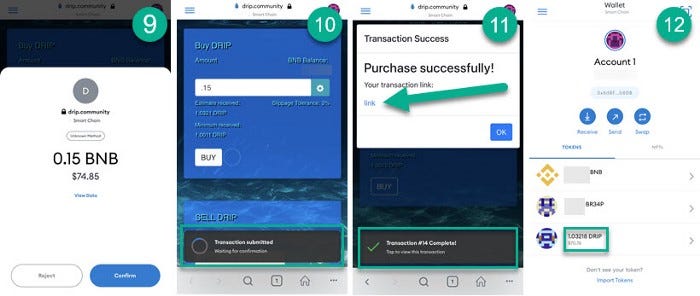
Scroll the confirmation pop up down to see the Confirm Button. Then you’ll see the Transaction in process and eventually the Transaction Success! Notice the arrow in image 11 pointing to the “link”. This takes you directly to the transaction on the Binance Smart Chain Explorer. And voilà! You now have successfully purchased DRIP and it can be viewed in your MetaMask wallet!
Deposit DRIP to the Faucet to Earn 1% Daily
In order to earn 1% Daily on your DRIP Tokens, they must be deposited/staked on the Faucet. DRIP deposited to the Faucet cannot be removed from the Faucet. However, the power of doing this allows you to grow your Available DRIP by 1% each day in perpetuity. Choose to either Hydrate (Compound) or Claim (Withdraw).
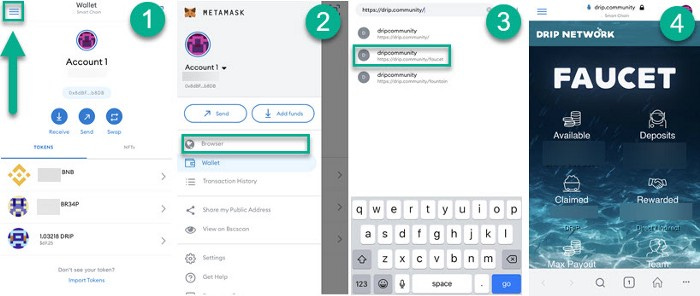
You should already be in the MetaMask Browser where you can navigate to the DRIP Faucet. If not, go to your MetaMask wallet and open the side menu to view the DRIP page in the browser. You’ll want to go to https://drip.community/faucet.
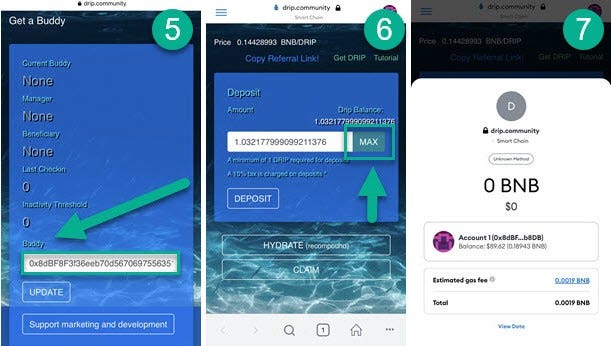
Your Deposit will require a Buddy so scroll down to the “Get a Buddy” area and copy/paste my Buddy Id below into the Buddy text field and select Update.
0x8dBF8F3f36eeb70d5670697556351CD1a774b8DB
Then hit the MAX button or enter the amount of DRIP you want to deposit. And select the DEPOSIT button. You should now see the MetaMask pop up confirmation.

Scroll down on the confirmation pop up until you can select Confirm. You’ll see the transaction in progress and then get a success alert upon completion.
CONGRATULATIONS!! You can now earn 1% DAILY!!!!
Go back to the MetaMask wallet browser and visit the Faucet daily in order to either Hydrate or Claim your 1% return. I’ll be posting articles in the future that have strategies for success, but I would focus on hydrating and growing your network for the first 30 days! If you need help or want to become my Buddy — feel free to reach out to me on Telegram at CryptOpenSource.
The Shameless Plug — Join My DRIP Team!
I love to code, watch movies, and enjoy writing about whatever comes to mind! I’m also a huge fan of cryptocurrency! I recently discovered DRIP and now there’s no turning back! If you’re interested in crypto it’s definitely worth researching!
DRIP is also an official partner with The Animal Farm! This will continue to help stabilize and decentralize the DRIP network!
Message me on telegram if you want to learn more! CryptOpenSource
What is DRIP?
DRIP is a DeFi project that is intended to provide passive income in a low-risk, high reward contract. DRIP tokens are purchased and then deposited into the Faucet, where they earn 1% each and every day! You can choose to Hydrate (compound) or Claim to pull the DRIP token out back out. That’s the skinny version at least! Read more about it here: What the heck is DRIP??

How to Start
Go to https://drip.community/fountain and exchange BNB for DRIP.
If you’re a total newbie and need a roadmap, read this easy to follow step by step guide: From Zero to Hero. Or ask questions in the Team ChatThen Go to: https://drip.community/faucet, and scroll down to Get a Buddy. You have to enter a Buddy address in the Referral section:
My Buddy: 0x8dBF8F3f36eeb70d5670697556351CD1a774b8DB
(You can click the “Buddy Detected” button if you use the link above to get there.)Then scroll back up to Deposit and deposit at least 1 DRIP (Ensure you have enough BNB left over to pay for the gas fees ~.01 to get started)
You’re setup on DRIP. Get ready to receive 1% daily!
I am part of the Cryptozoa DRIP team. We are a global community of DRIP enthusiasts who are welcoming and helpful. We converse on our own private Telegram group where we share DRIP tips, strategies, breaking news, and more. If you would like to be in the conversation, please join the Cryptozoa team (by getting into DRIP and using my Buddy address above), and then head over to the Cryptozoa Team Gateway. You must be in the DRIP Network to join so have your Buddy ID handy, and be sure to tell them you’re on team CryptOpenSource!
Nothing in this article is to be construed as investment advice. Neither the author nor the publication takes any responsibility or liability for any investments, profits or losses you may incur as a result of this information. The article may contain affiliate links